Setting Up a Tor Middle Relay Node
📅 Historical Content Notice: This article was originally published in January 2018. While the core concepts of running a Tor relay remain valid, specific configuration steps and best practices may have evolved. For current relay setup instructions, bandwidth requirements, and operator guidelines, please consult the official Tor Relay Guide.
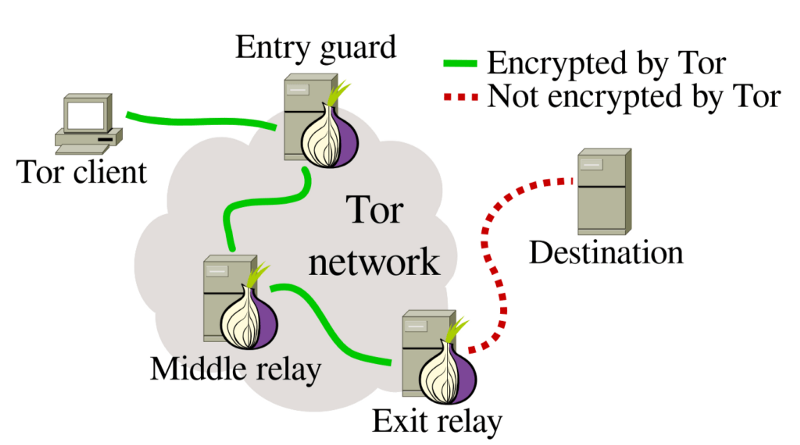
In the Tor network, there are several types of nodes, including Directory Nodes, Entry Guards, Middle Relays, and Exit Relays. To circumvent network surveillance, various bridge technologies like obfs3, obfs4, and meek are used. Users first connect to a Directory Node to obtain information about Entry, Middle, and Exit Nodes. The client then randomly selects nodes from these categories to form a circuit.
Setting up Directory Nodes is not typically done by individual users due to their complexity. Entry and Exit Nodes are often targeted for attacks or surveillance. Therefore, this article focuses on setting up a Middle Relay Node.
Preliminary Steps
For Mac:
- Install Homebrew.
- Execute
brew install tor. - Run Tor until you see 100% completion, then stop it with Control+C.
For Windows:
- Download the Tor Expert Bundle from Tor.
- Unzip it to a preferred location.
- Run
Tor.exefrom the Tor folder, wait for 100% completion, then close it.
For Ubuntu/Debian:
- Install Tor with
sudo apt-get install tor. - Run Tor from the terminal, wait for 100% completion, then stop it with Control+C.
Configuring the Torrc File
The latest version of the original Torrc configuration file can be found here.
Configuration File Locations:
- Mac:
/usr/local/etc/tor/torrc - Windows:
%appdata%\tor\torrc - Ubuntu/Debian:
/etc/tor/torrc
If the file is not present, create a new one with a text editor and ensure it has no file extension.
Modifying torrc
Add the following configurations to the torrc file. You can modify these settings as needed, then save the file:
ORPort 443
Exitpolicy reject *:*
Nickname Bitcoiner # Choose a preferred nickname, e.g., Bitcoiner
ContactInfo ***@gmail.com # Enter your email
AccountingMax 500 GBytes # Allocate 500 GB per month to Tor
AccountingStart month 3 15:00 # Reset usage on the 3rd of each month at 15:00
RelayBandwidthRate 100 KBytes # Limit traffic to 100KB/s (800Kbps)
RelayBandwidthBurst 200 KBytes # Allow bursts up to 200KB (1600Kbps)
Running the Relay
To run the relay:
- Mac: Enter
torin the terminal. - Windows: Run
tor.exefrom the Tor folder. - Ubuntu/Debian: Enter
torin the terminal.
Note: As port 443 is used, adjust your firewall settings accordingly.
Monitoring the Relay

Initially, your relay might not appear on the Tor Metrics site. However, after a sufficient duration (typically around three hours), it should become visible. You can search for your relay using the Nickname set in the torrc file. Here is an example of a relay monitoring page.
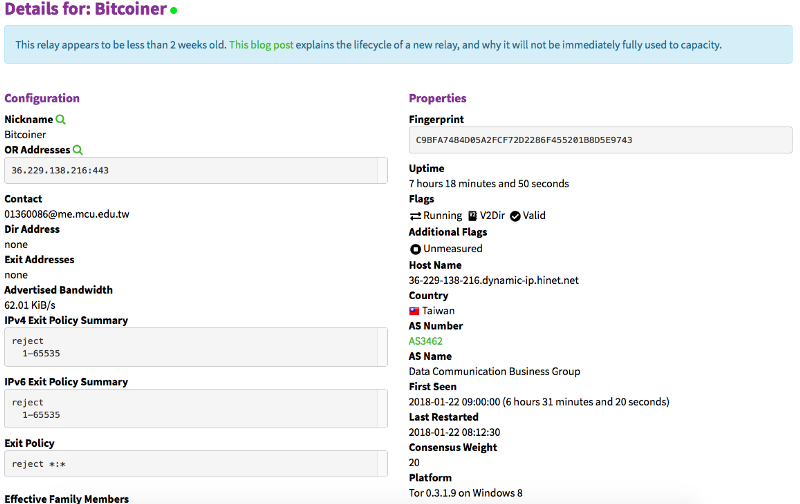
Please note the blue box at the top of the relay page. It indicates that new relays may not immediately serve as middle relays for the Tor network. They require a period of ‘familiarization’. For more information on the lifecycle of a new relay, refer to the original post here and its translated version here.
Conclusion
Setting up a Tor Middle Relay Node is a valuable contribution to the Tor network, enhancing its robustness and anonymity. By following these steps, you can successfully deploy your own middle relay and monitor its performance and impact on the network.